Breast augmentation increases breast volume, restores upper-pole fullness, and corrects asymmetry - using silicone or saline implants, a hybrid implant-plus-fat-transfer approach, or fat transfer alone in selected cases. At Dr. Shikha Bansal’s clinic in Gurgaon the technique is chosen at consultation based on chest width, tissue coverage, skin envelope, and the patient’s plans around future pregnancy and breastfeeding rather than from a single default size or pocket.
Key points
- Implant choice (silicone, saline, or fat transfer) matched to chest width, tissue thickness, and lifestyle
- Dual-plane pocket as the default - upper-pole softness without losing implant support
- Inframammary or periareolar incision chosen with future breastfeeding plans in mind
- Hybrid implant-plus-fat-transfer option when upper-pole tissue is too thin for an implant alone
- Same-day discharge with structured Day 0 to Month 3 recovery instructions
- Capsular-contracture-reduction protocol (Keller funnel, pocket irrigation, glove change) on every primary case
- Consented real-patient before-and-after photographs reviewed at consultation, with the anatomy-to-outcome reasoning explained rather than an outcome promised
What breast augmentation can address, and what it cannot
Breast augmentation - augmentation mammoplasty - is a surgical procedure that adds volume to the breast using a silicone implant, a saline implant, autologous fat transferred from another part of the body, or a combination of an implant with fat layered on top to soften the upper pole. It is the right call when the breast is genuinely small for the chest frame, has lost volume after pregnancy or weight loss, or is asymmetric in size or shape between the two sides.
It is not a treatment for sag. When the nipple sits at or below the inframammary fold and the upper pole is hollow, the underlying problem is ptosis (drooping) of the breast tissue on the chest wall, and an implant alone cannot lift that tissue. In those cases the right plan is either a breast lift (mastopexy) on its own or an augmentation-mastopexy combined procedure - the lift addresses position, the implant addresses volume. The candidacy decision between augmentation, lift, and the combined operation is a recurring conversation in the Gurgaon practice, and the clinically related options are discussed on the breast lift in Gurgaon page.
Breast augmentation is also not a route to a specific cup size. Cup labelling varies between bra brands and is a poor planning unit; volume in cubic centimetres of implant, placement, and the patient’s existing tissue together determine the post-operative shape. The size question is reframed at consultation in terms of chest width, tissue thickness, and the patient’s preference for proportionate-and-natural versus fuller-and-projected - a distinction Dr. Shikha walks through directly in the implant-sizing videos below.
Dr. Shikha explains

Breast implants: myths and facts

Understanding bra and cup sizes

How breast implant sizes work

Who is a good candidate for breast implants?
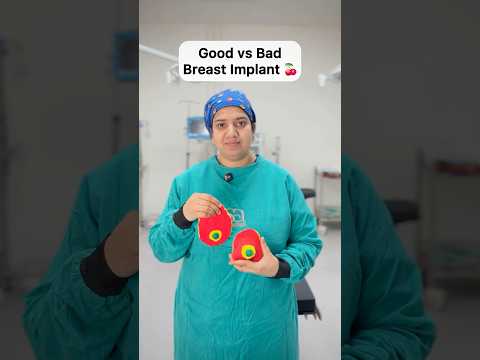
Same implant, different results on different bodies

Breast implants, this or that
Results
Breast Augmentation Before and After Photos
Breast augmentation results from the clinic's own patients. Use them to see how volume and shape change on different chests, not to predict your own result, which depends on your anatomy, the implant plan and how you heal.
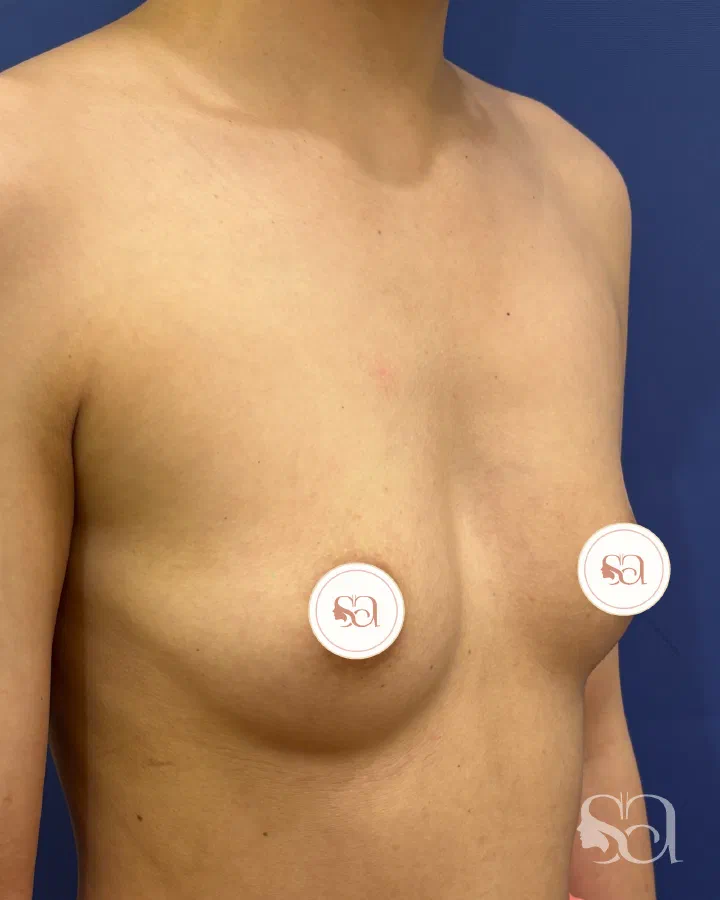 Before
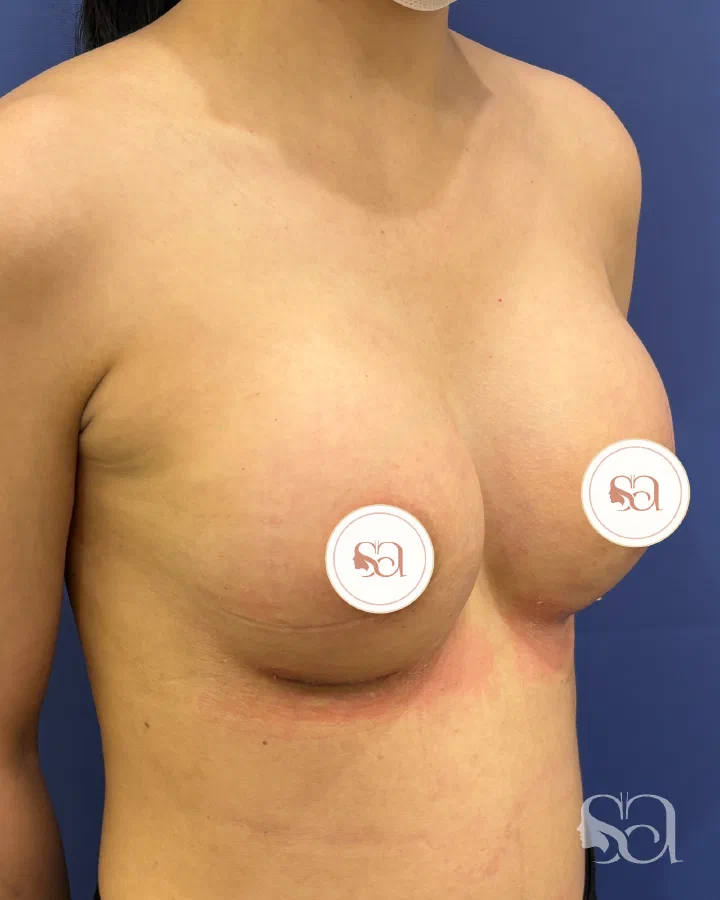 After
AfterThis result shows an unclothed body after surgery.
Breast Augmentation, case 1
- 3 weeks after surgery
- Results vary between individuals
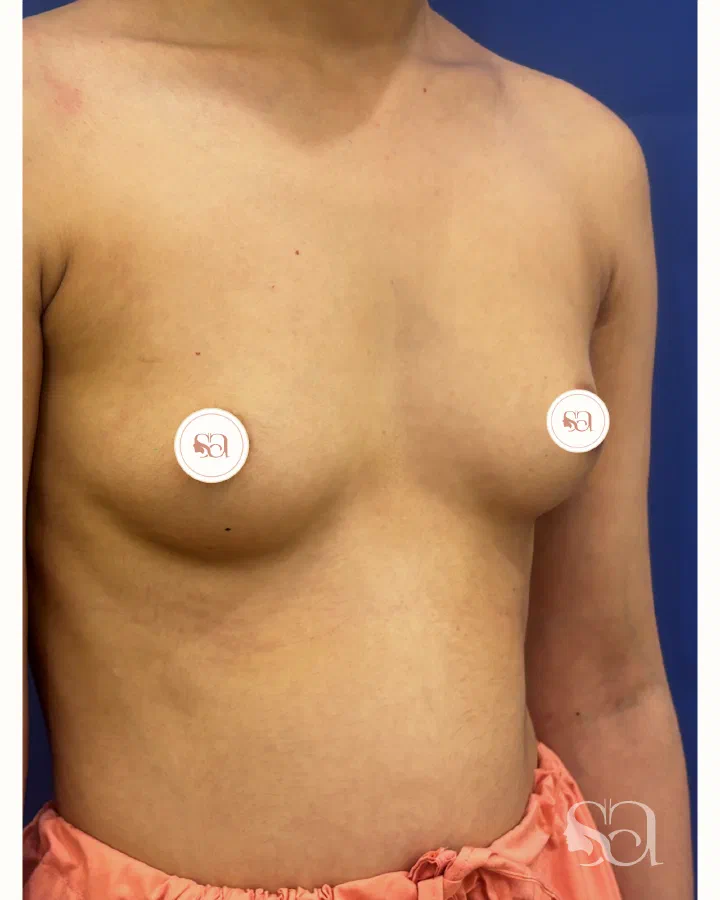 Before
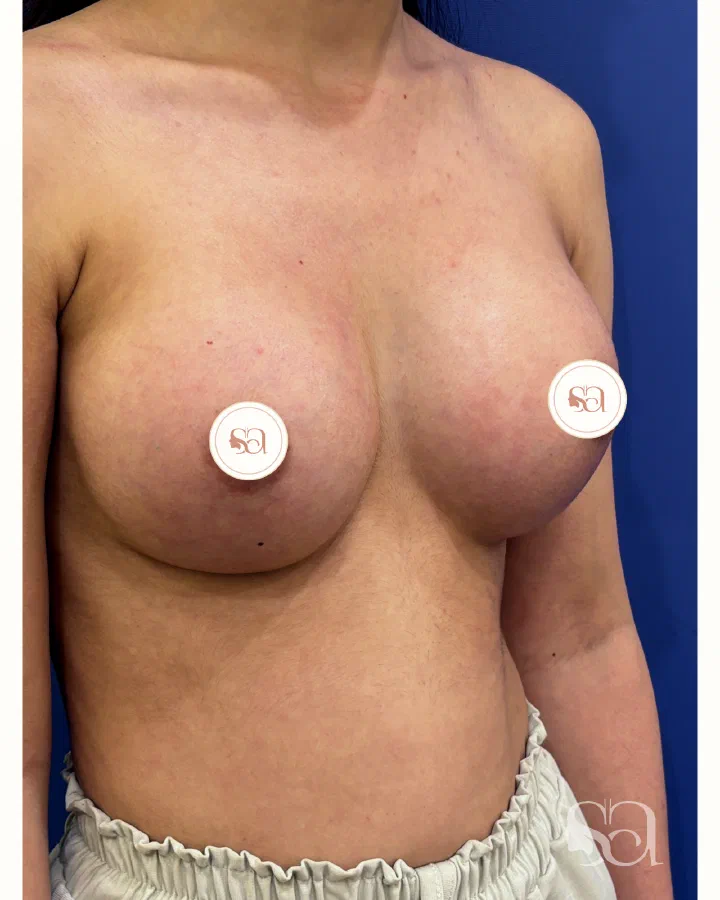 After
AfterThis result shows an unclothed body after surgery.
Breast Augmentation, case 2
- 5 weeks after surgery
- Results vary between individuals
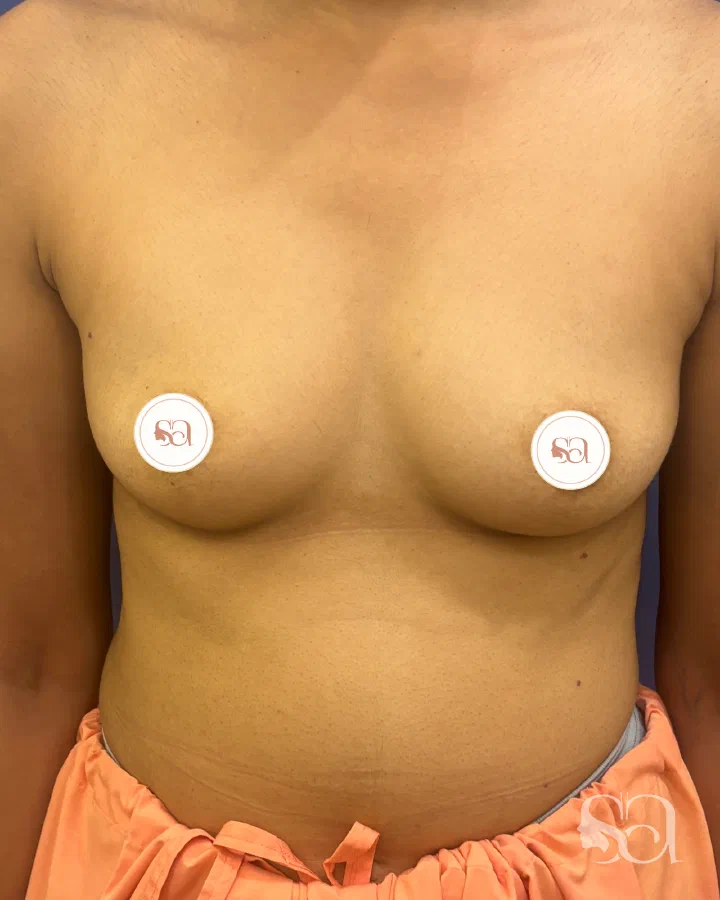 Before
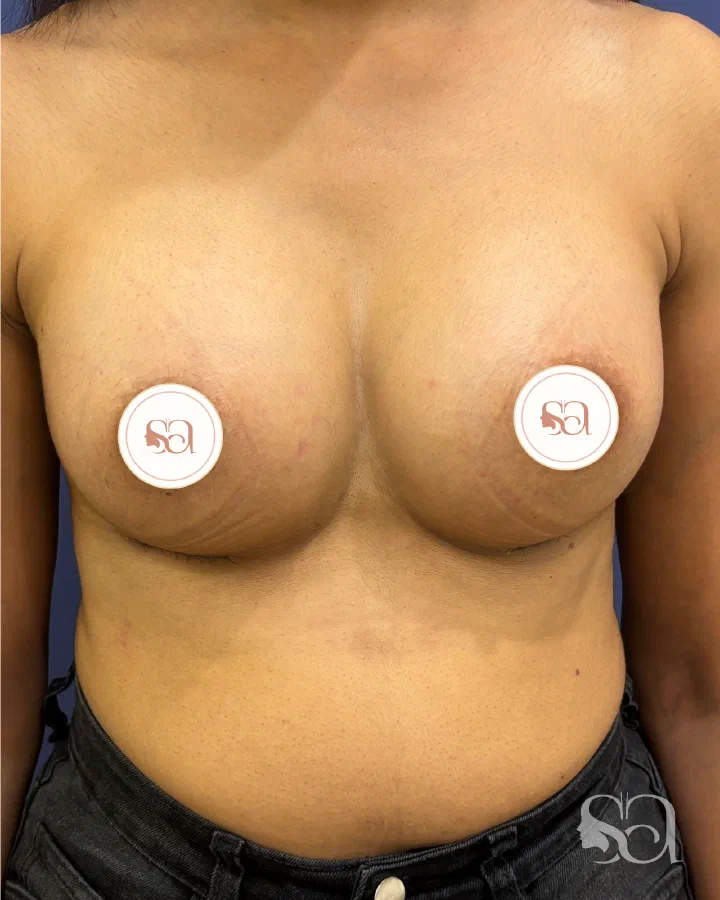 After
AfterThis result shows an unclothed body after surgery.
Breast Augmentation, case 3
- 3 weeks after surgery
- Results vary between individuals
Photographs of the clinic's own patients, shown with their written consent, with faces blurred or covered as far as the result allows. They explain what an operation can change; they are not a promise of your result.
How to read breast augmentation before and after photos
The gallery above is only useful if it is read the right way. Most patients scan for a result they like and stop there. The more informative habit is to compare the two frames of a single patient against each other, and then ask how close that patient’s starting anatomy is to their own.
Four things are worth comparing directly between the before frame and the after frame. Upper-pole fullness - how much volume sits above the nipple line, and whether the slope from collarbone to nipple reads as hollow, straight, or convex. Implant footprint against chest width - whether the breast base looks contained within the chest or spills toward the armpit, which is a base-diameter question rather than a volume question. Nipple position relative to the inframammary fold - if the nipple sat at or below the fold in the before frame, volume alone was never going to lift it, and the after frame will show either a lift scar pattern or a limited change in nipple position. Starting anatomy - chest width, tissue thickness, existing asymmetry, and skin quality. A before frame that looks nothing like the reader’s own starting point is a poor guide to what the reader can expect.
That last point is the reason an identical implant volume produces visibly different results on different frames. The same device is a modest, proportionate change on a broad chest with generous tissue coverage and a far more obvious one on a narrow chest with thin coverage - the implant is fixed, the envelope it sits in is not. Dr. Shikha Bansal walks through exactly this in the “Same implant, different results on different bodies” video on this page, and the anatomy-to-outcome patterns are broken down further in the guide to realistic breast augmentation results by patient archetype. It is also why implant volume in cubic centimetres, rather than a target cup size, is the planning unit at consultation - the implant sizing methodology explains how the measurements translate into a shortlist of devices.
Timing matters when reading any after photo. A frame taken at six weeks is not the endpoint: the implant is still settling into the pocket at that stage, shape is only largely final at around month three, and softening continues for several months after that. Hybrid cases with fat transfer take longer still, because the grafted fat continues to remodel for up to six months. A photograph is therefore only interpretable alongside how long after surgery it was taken.
Photographs on this page are educational reference, not a predicted outcome. No before-and-after image can be read as the result any individual patient will get, and no outcome is promised at consultation or implied by this gallery - the honest use of these photos is to make the anatomy-to-outcome reasoning visible, so the plan discussed in the room is easier to picture. Every photograph shown here is of a patient who has given written consent for educational use, with faces blurred.
Silicone, saline, fat transfer, and the technique families used at the clinic
There is no single best implant or technique. The choice is made at consultation across several decisions, each of which has a clean clinical rationale rather than a one-size-fits-all answer. The “this or that” video on this page covers some of these decisions in short form; the detailed reasoning sits below.
Silicone vs saline implants
Silicone gel implants are the default at the clinic for most patients. The cohesive silicone gel feels closer to natural breast tissue than saline, ripples less under thin skin, and the modern fifth-generation cohesive shells are far less prone to silent rupture than the older devices that drove implant scares two decades ago. Silicone is the right choice for patients with thin tissue coverage where a saline shell would be palpable.
Saline implants remain useful in a narrow set of cases - for example, where a smaller incision is preferred (the implant is placed empty and then filled), or where the patient specifically wants the option of detecting a rupture immediately (a saline rupture deflates visibly within hours; a silent silicone rupture is detected only on imaging). Saline is more likely to ripple in patients with thin tissue.
Brand choice sits alongside the silicone-versus-saline decision; the device families used in India are compared in the Motiva vs Mentor vs Allergan implant brand comparison.
Round vs teardrop (anatomical) implants
Round implants give upper-pole fullness; teardrop (anatomical) implants distribute more volume to the lower pole. Neither shape is inherently more natural - which one reads as natural depends on the existing breast base and the tissue available to drape over the device.
Implant profile and projection - matching base diameter to chest width
Low, moderate, moderate-plus, high, and extra-high profiles each have a defined base diameter and projection. The profile is matched to the chest width measured at consultation, not chosen from a brochure. Going wider than the chest gives a “side-boob” look in clothing; going narrower wastes the implant under the breast. How those measurements are taken and converted into a volume-and-profile shortlist is set out in the breast implant sizing methodology.
Over the muscle vs under the muscle - subglandular, subpectoral, dual-plane
Subpectoral placement is preferred when tissue coverage over the upper pole is thin, because the muscle layer hides the implant edge and reduces visible rippling. Subglandular placement is faster to recover from and avoids “animation deformity” (implant moving with chest contraction during exercise) but requires adequate native tissue. Dual-plane is the workhorse middle ground - upper pole under muscle, lower pole under gland - and is used in most augmentations at the clinic.
Fat transfer breast augmentation
Fat transfer breast augmentation uses liposuction-harvested fat from the abdomen, flanks, or thighs, processed and re-injected into the breast. It is best suited to patients who want a modest volume increase (typically half a cup to one cup, depending on take), have enough donor fat, and prefer to avoid an implant device entirely. How much of the grafted fat survives cannot be predicted in advance for an individual patient: published series report breast fat-graft retention across a wide band - roughly 40 to 80 per cent - and pooled averages in systematic reviews sit nearer half, varying with harvesting and processing technique, how much volume is injected into the breast, and patient factors. Over-correction at the time of grafting is planned in for that reason, and a second grafting session is sometimes needed to reach the volume goal.
Hybrid breast augmentation - implant plus fat transfer
Hybrid breast augmentation combines a smaller implant under the muscle with fat transfer over the top. This is used when the patient wants substantial volume but has very thin upper-pole tissue that would show implant edges; the layered fat acts as a permanent soft cover. The hybrid approach is also useful when the patient wants to address minor asymmetry that an implant alone cannot fine-tune. What the hybrid operation involves, who it suits, and how the grafted fat behaves over the first six months are covered in the guide to hybrid breast augmentation in India.
A separate and connected decision - implant versus fat transfer alone - is covered in detail on the breast augmentation versus fat transfer comparison blog for patients still weighing the two.
Talk it through with Dr. Shikha
Book a consultation at Dr. Shikha Aesthetics in Sushant Lok 1. Bring your questions about breast augmentation, and any previous reports.
How the technique is matched to the patient
At the consultation the chest is measured: chest width at the nipple line, tissue thickness pinched at the upper pole, breast base diameter, areolar position relative to the inframammary fold, skin elasticity, and the existing degree of asymmetry between the two sides. Photographs are taken in standardised lighting and views. The patient’s history is reviewed for prior breast biopsies, family history of breast cancer, smoking, prior pregnancies and breastfeeding, and plans for future children.
Thin upper-pole tissue (under 2 cm pinch)
Subpectoral or dual-plane pocket, silicone gel, moderate to moderate-plus profile. A thin patient with a high-profile implant placed subglandularly will see the implant edge.
Adequate tissue coverage and an active gym or upper-body lifting lifestyle
Subglandular or dual-plane to avoid animation deformity during chest exercise. Some weightlifting patients specifically prefer subglandular for this reason, and the trade-off in upper-pole softness is accepted.
Wide chest, narrow breast base
Wider implants paired with fat transfer to the inner cleavage to fill the gap; or staged fat-only augmentation when the volume goal is modest.
Future pregnancy and breastfeeding planned
The discussion turns on incision choice and pocket. The inframammary-fold incision preserves the milk ducts and nerve supply best; the periareolar approach has a slightly higher risk of breastfeeding difficulty. Implants under the muscle do not block breastfeeding. Patients are told that pregnancy itself will change breast shape and volume regardless of implants, and that some patients choose to delay augmentation until after they are done having children. What the evidence says about milk supply after each incision, and how feeding is supported afterwards, is covered in the guide to breastfeeding after breast surgery.
Existing ptosis (sag)
Implant alone is not the right answer. The plan moves to lift-only, lift-plus-implant, or lift-plus-fat-transfer depending on the degree of ptosis. The augmentation-mastopexy combined operation is one of the most demanding in breast surgery and is planned with extra care for nipple position and scar pattern.
Asymmetric breasts
Different implant volumes between the two sides, sometimes with fat transfer added on the smaller side. Cup-size symmetry is not always achievable when the underlying breast bases differ; the goal is shape symmetry first, volume symmetry second. How asymmetry is graded and what each correction option can and cannot even out is set out in the guide to breast asymmetry correction.
Patients searching for “scarless” breast augmentation
There is no truly scarless breast implant procedure; the implant has to enter through some incision. The least visible options are the inframammary-fold scar (hidden in the bra-line crease, fades to a fine line) and the trans-axillary approach (implant placed empty through an armpit incision and then filled, used selectively for saline). Periareolar scars are also fine line but cross the areolar margin. Patients arriving on this query are walked through the realistic incision options at consultation rather than promised a result no surgical augmentation can deliver.
The procedure, from consultation to same-day discharge
The first consultation runs 45 to 60 minutes. The chest is examined and measured, photographs are taken in five standard views, and the patient is asked to bring or describe the breast appearance she is aiming for in clothing. Implant sizers and 3D planning visualisation are used in selected cases to make the volume conversation concrete; the limitation of any such tool is that the simulated image cannot fully predict how an implant will settle into the patient’s specific tissue, and that caveat is stated up front. A pre-operative mammogram or ultrasound is arranged for patients above 40 or with a family history of breast cancer.
Pre-operative work-up includes a baseline blood profile, ECG and physician fitness clearance, and instructions to stop blood thinners, oestrogen-based oral contraceptives where the physician advises, and smoking for at least four weeks before and four weeks after surgery. Smoking is a non-negotiable risk factor for poor wound healing, capsular contracture, and nipple-related complications.
The operation is performed under general anaesthesia at the clinic’s day-care operating facility. Surgical time is typically 75 to 120 minutes for a standard implant augmentation, longer when fat transfer or a lift component is added. The implant is placed through the chosen incision, the pocket is dissected to the planned dimensions, the implant is positioned, and the wound is closed in layers with absorbable sutures. A supportive bra is applied in theatre.
Most patients are discharged the same day - typically four to six hours after the surgery ends - once they are alert, can drink fluids, and have walked to the bathroom independently. Overnight observation is offered when the patient lives more than 90 minutes from the clinic or has a medical comorbidity that warrants it. There is no surgical drain in the standard implant case; drains are used selectively in larger pockets or when fat transfer adds volume.
Recovery after breast augmentation, week by week
Recovery follows a predictable timeline, with the first three days being the most uncomfortable and steady improvement from there. The clinical milestones are below; for the real-life questions that sit alongside them - when the gym, yoga, driving, and intimacy actually resume - the guide to returning to normal life after breast augmentation goes into more day-to-day detail than this clinical timeline does.
Day 0 to Day 3
Chest tightness, soreness with arm movement, swelling, and a sensation of pressure are universal. Pain is moderate and is managed with oral analgesics; intravenous opioids are not needed for most patients. Sleeping in a propped-up position (back of the bed raised at 30 to 45 degrees, pillows under the elbows) reduces swelling and is more comfortable than lying flat. Cold compresses are used over the chest in 15-minute intervals. The supportive bra is worn day and night.
Day 4 to Day 7
Pain steps down to manageable, and many patients stop the strong analgesic and continue with paracetamol only. Light walking around the house is encouraged from day one and gradually extends. Driving is not permitted while the patient is on opioid analgesia. Office-based desk work is comfortable from day five to seven for patients with a sedentary job; jobs that require lifting children or upper-body exertion need the full recovery window. The first follow-up at the clinic is between day five and day seven.
Week 2 - the drop-and-fluff stage
Most of the surface bruising has faded. The implants still sit a little high on the chest at this stage; this is expected and resolves as the pocket relaxes and the implant settles (“drop and fluff”). Sutures are absorbable and do not need to be removed. Light upper-body movement is fine; gym work is not yet permitted.
Weeks 4 to 6
The implant has settled visibly into the lower pole, and the breast shape begins to look like the planned final result rather than the immediate post-operative shape. Light cardio and lower-body strength work resume from week four. Chest exercises and any movement that loads the pectoral muscle are held back until week six and reintroduced gradually.
Month 3 and beyond
Final shape is largely settled, scars have transitioned from pink to fading, and full gym work including chest exercises is permitted. The implant continues to soften into its pocket for several more months, but at three months the patient sees what the augmentation is going to look like long-term. A six-month review with photographs documents the final result. Hybrid cases with fat transfer take slightly longer to settle because the grafted fat continues to remodel for up to six months.
Sleep position returns to normal between weeks four and six; the supportive bra is worn 24 hours a day for four to six weeks and then transitioned to daytime wear only.
Implant longevity, capsular contracture, and when revision is needed
Modern silicone implants are durable but they are not lifetime devices. The realistic expectation discussed at consultation is that an implant will last for many years - often 10 to 20 - but that some patients will need a revision earlier. The triggers for revision fall into a few defined buckets, and recognising them early avoids more difficult revision later.
Risks and complications to weigh before deciding
Breast augmentation carries a defined complication profile, and since the FDA’s October 2021 labelling action that profile has to be put in front of a patient before consent rather than after. The risks that matter most in practice:
Changed or lost sensation. Altered nipple and breast sensation - reduced, heightened, or numb - is common in the early months and usually recovers, but a permanent change in nipple sensation is possible with any incision and any pocket. It can affect sexual sensation and, occasionally, the let-down reflex in breastfeeding.
Infection, haematoma, and seroma. Bleeding into the pocket (haematoma) or a fluid collection (seroma) in the first days can need drainage, and an early haematoma also raises the later risk of capsular contracture. Infection around an implant sometimes settles on antibiotics but can require the implant to be removed and replaced only after an interval of several months.
Malposition, rotation, rippling, and palpability. An implant can sit too high, too low, or too far towards the armpit; anatomical (teardrop) devices can rotate out of orientation; and under thin tissue the implant edge or surface rippling can be visible or palpable. These are among the commoner reasons patients return for revision.
Wound-healing problems and scarring. Delayed healing, wound separation, and hypertrophic or keloid scarring are more likely in smokers, in diabetics, and in patients with a keloid history - which is why smoking cessation for four weeks either side of surgery is treated as non-negotiable.
General anaesthetic risk. Small in a fit patient but real, which is why the baseline blood profile, ECG, and physician fitness clearance described above are not formalities.
The likelihood of further surgery over a lifetime. In the FDA post-approval core studies roughly 20 to 40 per cent of augmentation patients had a further operation within the first 8 to 10 years, and about one in five primary augmentation patients had the device removed within 10 years. The longer an implant stays in place, the higher the chance of a complication that needs surgery to correct.
Systemic symptoms (“breast implant illness”). Some patients with implants report fatigue, joint and muscle pain, difficulty with memory and concentration, hair loss, rash, and mood changes - a cluster widely called breast implant illness or BII. It is not a formal diagnosis, and a causal link between implants and these symptoms has not been established; the FDA nonetheless requires it to be disclosed in implant labelling, and some patients report improvement after implant and capsule removal. Patients who report these symptoms are worked up and taken seriously rather than dismissed.
Nothing on this page is a promise of a particular outcome. The risks above apply to every patient, and the point of listing them is that the decision is made with the full picture in view - the detail behind each of them is worked through in person before consent.
Capsular contracture
Capsular contracture is the body’s scar capsule around the implant tightening over time, distorting the implant from a soft round shape into something firmer and higher-riding. Mild contracture (Baker grade I to II) is monitored. Moderate to severe contracture (grade III to IV) is treated by capsulectomy - surgical removal of the scar capsule - usually with implant exchange in the same operation. Risk factors include sub-clinical infection at the time of original surgery, haematoma in the early post-operative period, and smoking. The clinic uses standard contracture-reduction measures (no-touch insertion technique with a Keller funnel, antibiotic pocket irrigation, glove change before implant handling) on every primary augmentation. These measures are intended to reduce risk, not to eliminate it.
Implant rupture and surveillance imaging
Silicone gel ruptures are usually silent and detected on MRI or ultrasound; saline ruptures deflate visibly. The current FDA recommendation is MRI or ultrasound surveillance from year five or six after silicone implant placement, then every two to three years thereafter - see the FDA guidance on breast implants for the current wording. A confirmed rupture is treated by implant exchange.
BIA-ALCL and implant shell texture
Patients ask about BIA-ALCL - breast implant-associated anaplastic large cell lymphoma - directly, and it is answered rather than deflected. It is a rare lymphoma arising in the scar capsule around an implant, not a breast cancer, and reported cases have been associated overwhelmingly with textured implant shells rather than the smooth cohesive devices used in most primary augmentations at this clinic; regulators including the FDA continue to monitor it, and the absolute risk in the reported literature is low. Because it is rare rather than absent, the working position is surveillance rather than reassurance: a late seroma, unexplained swelling, or a change in the capsule is investigated rather than watched. What the current evidence shows, how shell texture factors in, and what monitoring involves are set out in the breast implant safety, capsular contracture and BIA-ALCL guide.
Size or shape regret
Some patients want a different size after living with the implant for a year or two, or after a pregnancy reshapes the breast. Implant exchange to a different size or profile is a less complex revision than capsular contracture removal.
Long-term changes from pregnancy and weight
Pregnancy, breastfeeding, and significant weight change all reshape the breast around the implant and may produce ptosis that the original implant cannot lift. The right answer at that stage is sometimes implant exchange combined with a breast lift.
The signs that suggest revision is worth a conversation - firmness, asymmetry change, pain, or an implant that feels like it has moved - are covered in depth on the breast implant revision and removal signs blog. Long-term breast cancer screening with implants is unchanged in principle but uses additional displacement views; the practical implications of mammograms with implants are covered on the mammograms with breast implants in India blog.
Breast augmentation in Gurgaon and Delhi NCR - what to expect
The clinic sees breast augmentation patients from across Delhi NCR - Gurgaon, Delhi, Noida, Faridabad, Ghaziabad - and from outside the region, for patients who travel in to consult. Most patients are seen for one consultation, then return for the surgery on a separate day; the consultation is unhurried and is not a same-day procedure visit.
Consultations and surgery are carried out by Dr. Shikha Bansal, MBBS (Gold Medalist), MS General Surgery, MCh Plastic & Reconstructive Surgery (SMS Medical College, Jaipur, 2022), registered with the Haryana Medical Council (Reg No. 24859); the training, registration, and case-volume checks worth applying to any surgeon before booking are set out in the guide to choosing a breast augmentation surgeon. The clinic operates from Gurgaon with a day-care operating facility on site. Out-of-station patients are advised to plan a stay of approximately seven days post-operatively before flying. The two reasons for the seven-day window are the risk of venous thromboembolism - deep vein thrombosis and pulmonary embolism - after a general anaesthetic followed by prolonged immobility in a seat, and the lack of immediate access for the day-five review if something needs checking. Frequent mobilisation and calf exercises in flight, good hydration, avoiding alcohol, and graduated compression stockings are advised for that first flight, and any calf pain, one-sided leg swelling, breathlessness, or chest pain after travel is treated as urgent. Cabin pressure itself is not the concern: implants tested at simulated altitudes well above a commercial cabin expand only insignificantly. The full itinerary for a single-trip plan is laid out in the out-of-station and NRI planning guide. Within-NCR patients are driven home by a family member four to six hours after surgery; patients do not drive themselves after a general anaesthetic.
Consultations are by appointment. Photographs taken at consultation are stored securely and are used only for clinical planning unless the patient explicitly consents to before-and-after use for educational purposes. The before-and-after gallery on this page is comprised of patients who have given that consent in writing. The clinic’s positioning is surgical - augmentation, lift, and revision - and non-surgical “breast enhancement” approaches such as topical creams, suction devices, or filler are not offered, because none of them produce a measurable, durable change in breast volume; that conversation is handled at consultation as a myth-bust rather than a service offering.